Are you 3D printing a large prop that you’ll be lugging around or lots of heavy armor that you’ll be wearing? If so, then you should consider printing using a lightweight filament. Lightweight filaments allow you to print parts that are 40%-50% lighter than the average filament, meaning you can take what would be a 8lbs sword and have it be 4lbs instead!
Lightweight filament works by introducing chemicals into the plastic that cause it to foam when heated to certain temperatures. This foaming action means less material is needed for a given volume of printed part than if you used a non-foaming filament because the part contains more air.
There are two types of lightweight filaments available on the market: active foaming and passive foaming. Passive foaming filaments are lightweight filaments that have already been foamed by the manufacturer, which means they don’t need as much tuning on your 3D printer to get working. Active foaming filaments, on the other hand require, a lot of calibration to print successfully, but the upside is that there are more material options with different properties for active foaming filaments such as ASA and varioshore TPU.
This tutorial focuses on active foaming lightweight filaments. If you want a tutorial on passive foaming materials, let us know!
Guide Contents
This guide covers the following subjects:
- Comparing to Non-Foaming Filaments
- The Calibration Process
- Settings to Adjust
- Tuning Your Printer to Use Lightweight Filaments
- Other Lightweight Materials
- Visual Troubleshooting Guide
Comparing to Non-Foaming Filaments
Before we get into the process of calibrating your 3D printer to print active foaming lightweight filament, we should discuss some of the differences with non-foaming filaments. In short: lightweight filament tends to be weaker in terms of shear strength compared to normal filament. This means that parts printed with lightweight filament are more likely to delaminate, or break, along the layer lines. To prevent breakages like this, there are a few strategies.

An example of a breakage caused by poor shear strength. While it still takes effort to break, it’s on the easier end to break compared to non-foaming PETG or PLA.
First, it’s important to consider the print orientation of the part. There is a bit of an art to this that requires some practice because you need to consider how you will be using the part as well as how you want the print quality to turn out. For example, if you are printing a sword blade, it may be better to rotate it in your slicer so that it is being printed horizontally along the blade instead of vertically because you’ll be swinging it around. However, this also means that the underside of the blade will be rougher because it will need to be supported. So you will need to balance how you rotate your print in the slicer between the increased amount of time taken to sand the prop vs. its strength. That said, for sword blades you can often print them vertically because there’s room for an internal support like a dowel to prevent it from shearing.
Second, there are times that lightweight filament may not be the right choice for all pieces of your prop or armor. This often occurs in areas where the prop is too curved to use a rod to prevent it from shearing. For these areas it may be better to use a non-foaming filament instead of a lightweight filament. For example, this picture showcases the Edenmorn Gunblade where the majority of it is printed with ColorFabb’s high temperature lightweight PLA material (LW-PLA-HT.) However, the handle is printed with PETG because it needed to be strong in a way that LW-PLA-HT couldn’t be. This strength means the handle can support the entire weight of the blade when carried. As a bonus, because the blade was so light, the added weight in the handle made it more balanced than it otherwise would have been, which made it even easier to pose with.

An example where the main body of the Edenmorn Gunblade was printed using lightweight filament, but the handle was printed with non-foaming PETG because more strength was needed than lightweight filament could provide.

Dangerous Ladies’ Edenmorn Gunblade. The blade and body were printed with ColorFabb’s LW-PLA-HT while the handle and top spike were printed with PETG for strength.
Another key difference between lightweight filaments and non-foaming filaments is that the surface quality of lightweight filaments tends to be easier to finish than that of non-foaming filaments. This is because the layer lines on pieces printed with lightweight filaments tend to blend together more due to the foaming action of lightweight filaments, even when printing at 0.2mm layer heights. Additionally, because there is a lot of air in these prints, imperfections sand down easier as well. This is somewhat offset by the downside that lightweight filament prints tend to have a number of filament hairs on them due to turning off the Retraction setting in your slicer to print them. Retraction is the process of 3D printers pulling the filament back into the nozzle a little bit to prevent filament from leaking out of the extruder when the print head has to move to a different section of the job being printed. These hairs are easily removed by hand or a light sanding.
 An example of the hairs you should expect from turning off retraction.

The model after about 30 seconds of work removing the hairs using a print removal tool. Lightly sanding with a lower grit sandpaper also works well. Plus, you’ll need to use that same sandpaper to get rid of the remaining bumps from the hairs as part of the finishing process. Due to the foamed nature of lightweight filaments, they tend to be easier to sand than props printed with non-lightweight filaments.

The Calibration Process
You’ve designed or bought the 3D files for a large prop, such as Seiryu's Greatbow, and want to print it with lightweight filament. How do you get started? This section covers the settings you will want to adjust in your slicer followed by the steps to calibrate your slicer to print with lightweight filament.
Settings to Adjust
This section explains the settings on your printer that you will want to adjust before you start the calibration process. The names for these settings are taken from the Cura slicer, but similarly named settings should exist in your slicer of choice. I have also included the settings that I use on my 3D printer for ColorFabb’s LW-PLA-HT material, and these settings should be similar for most other lightweight filaments. That said, make sure to read the filament manufacturer’s instructions and, when in doubt, use the manufacturer’s instructions and/or settings. Every lightweight filament is different, and this guide unfortunately can’t cover every combination of options out there!
- Layer Height: 0.2mm
- Generally speaking, lightweight filaments do not support higher resolution layer heights. However, the foaming action of lightweight filaments means you get a print quality more like what you’d see at 0.15mm with a non-foaming filament filament.
- Printing Temperature: Result of the tuning steps in the next section.
- This is variable depending on your printer, and you will need to set this according to the results you get via the calibration process. For reference, on my Ultimaker 3 using ColorFabb’s LW-PLA-HT, my temperature is set to 229C.
- Initial Layer Printing Temperature: Below the Printing Temperature
- This will change depending on your manufacturer instructions but will usually be set to a temperature below where foaming action starts. This is because 3D printers squish the initial print layer; if your lightweight filament is foaming during the initial layer, it will cause issues with build plate adhesion as well as gunk up the nozzle.
- Initial Printing Temperature: Set this to be the same as Initial Layer Printing Temperature
- Final Printing Temperature: Set this to be the same as Printing Temperature
- This is the temperature that the 3D printer will end 3D printing at before starting the cooldown process.
- Flow: Result of the tuning steps in the next section.
- This is what will determine how heavy the final result will be, and you will need to set this according to the results you get via the calibration process. For reference, on my Ultimaker 3 using ColorFabb’s LW-PLA-HT filament, my Flow setting is 50%. This means that when printing with LW-PLA-HT, the prints are 50% of the weight they would be relative to non-foaming PLA. The Flow - and therefore weight reduction compared to non-foaming filament - is generally between 50% and 60%, but I have seen people get their print weight down to 45%. It really depends on the 3D printer, the environment, and how much time you want to spend calibrating and tweaking settings.
- Wall Flow: Set this to be the same as Flow.
- Inner Walls Flow: Set this to be the same as Flow.
- Top/Bottom Flow: Set this to be the same as Flow.
- Initial Layer Inner Wall Flow: 100%
- Since the initial layer should have no foaming action, you want this to be set to 100% as if it were printing a normal PLA filament.
- Initial Layer Outer Wall Flow: 100%
- Similar to the Initial Layer Inner Wall Flow, we want this to be 100%.
- Initial Layer Bottom Flow: 100%
- Similar to the Initial Layer Inner Wall Flow, we want this to be 100%.
- Print Speed: Set according to filament manufacturer’s instructions.
- Generally speaking, this will be set to 40mm/s but different filament manufacturers will have different instructions. If you have a high speed printer, such as a BambuLab printer, you can try higher speeds - but you will likely need to take a lot more care when calibrating and use a higher Printing Temperature. This is because lightweight filaments need enough heat to foam, which comes from a combination of the nozzle temperature and the time the filament spends in the nozzle. If you do try higher speeds, you will thus have to compensate for the filament spending less time in the nozzle by increasing the temperature.
- Minimum Layer Time: Set to 0 or the lowest possible setting for your printer. For most other materials, you want a reasonable minimum layer time to prevent overheating of the part being printed because if it overheats it can deform. However, lightweight filament is particularly sensitive to how much energy (heat) is transferred into it for foaming, so you always want the filament moving through the extruder at a constant rate. This does increase the chances of overheating occurring, see the troubleshooting section for more information on solving this.
- Wall Speed: Set to this to be the same as Print Speed (40mm/s)
- Outer Wall Speed: Set this to be the same as Print Speed (40mm/s)
- Top/Bottom Speed: Set this to be the same as Print Speed (40mm/s)
- Initial Layer Speed: 20mm/s
- To improve build plate adhesion, you want the initial layer to be slower than the other layers. You can use even slower speeds if you still have trouble with adhesion, but I wouldn’t suggest any faster.
- Skirt/Brim Speed: 20mm/s
- For the same reasoning above, the skirt/brim should be printed at 20 mm/s or less.
- Wall Acceleration: 3000mm/s^2
- You can experiment with acceleration settings, but keep in mind that due to the foaming action of lightweight filaments, if this is set too low you’ll run into issues where sharp corners will deform into blobs. This is because with traditional filaments, the print head would decelerate more gently at these corners; but when using lightweight filaments, this results in the filament spending too long in the print head and foaming more than it should. Additionally, the print head can heat up previous layers of the filament causing additional expansion as well.
- Having a high acceleration value will result in the 3D printer shaking more and there could be issues with ringing, but these issues are small and don’t add any time to the process of finishing cosplay props.

An example of the amount of ringing you should expect with high acceleration. Generally speaking, it doesn’t require extra work because it won’t be visible after the normal process of sanding and painting a 3D printed prop.
- Outer Wall Acceleration: Set to the same as Wall Acceleration.
- Top/Bottom Acceleration: Set to the same as Wall Acceleration
- Enable Retraction: False
- For lightweight filaments you absolutely do not want retraction. This is because, like with acceleration, retraction will lead to the filament spending too much time in the nozzle. This then leads to the lightweight filament absorbing too much energy which causes extra foaming.
- With retraction disabled you will end up with a lot of fine hairs on the 3D print, but these are easily removed with a quick sanding. I often remove them with just my fingers - that’s how easy these hairs are to remove.
- Enable Print Cooling: False
- Again, for lightweight filaments we don’t want any cooling of the print because heat is needed to trigger the foaming action.
- Z-Seam Alignment:
- This setting should be adjusted depending on the model you are printing and exactly where you want the hairs on the object to be. In general, you want the hairs to be on a spot where they’re easy to remove, won’t interfere with fitting parts together, and minimized on detailed sections of the model. Use the preview mode in your slicer to look at where the travels are, this is where hairs will be produced due to the lack of retraction when printing with lightweight filaments.
- Seam Corner Preference:
- See the section on Z-Seam Alignment.

An example of setting up the z-seam alignment in the slicer. The blue lines are where the hairs will be generated. The edges of swords or flat areas that are easy to sand are great spots to put the z-seam.
Tuning Your Printer to Use Lightweight Filaments
First, make sure you have some digital calipers, masking tape, and a pen handy, along with some calibration files. You will want to use the masking tape and pen to label the various calibration pieces you print so that you can compare them without losing track of which object had which settings.
You can download calibration tools made specifically for these next steps, here!
These are the steps for calibrating your printer to print with lightweight filament. Everyone’s printer and printing environment are different so what works for one printer may not work for another. The key thing to understand when calibrating is that it’s about optimizing the amount of energy that the lightweight filament absorbs to maximize foaming. The two main ways to adjust the amount of energy being absorbed are the Flow, or speed at which filament moves through the extruder, and Printing Temperature, which is the amount of heat energy being emitted into the filament.
- Start off by printing the single-wall rectangle calibration file at various slicer settings to determine where the maximum amount of foaming is given the size of your nozzle (often 0.4mm.) Once you’ve got the settings that give you enough foaming while maintaining the desired wall size, move on to step two.
- The main settings that you will be adjusting here will be the Printing Temperature and Flow.

This is what the wall thickness is for the optimal settings on my 3D printer with a 0.4mm wide nozzle. Due to variance in the line width, having a result between 0.4mm and 0.42mm is preferred compared to a result between 0.38mm and 0.4mm
- Print the 2cm by 2cm cube calibration file and ensure that its print quality looks good while checking that it is within +/- 0.1mm on each side. If it looks good and the measurements fit, move on to the next step; otherwise adjust print settings further and repeat this and/or the first test.
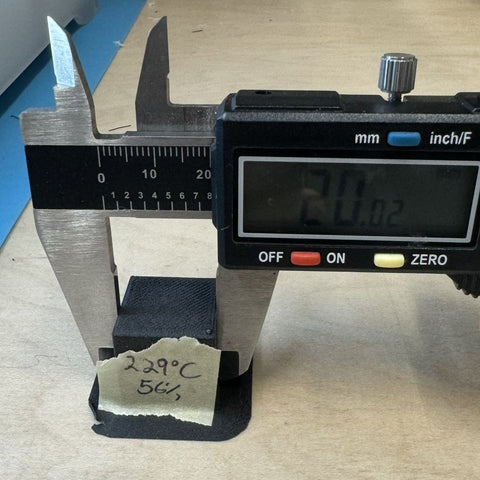

The top view of the same cube, notice that there is an additional 0.1mm of variance. This is due to some blobbing at the corners. This blobbing is to be expected but should not be very noticeable, if it is, see the troubleshooting section below.
- Print all of the dovetail connections calibration files and fit them together to see what your tolerances are. In particular, if you find that even with no clearances there is lots of room between the pieces, you will want to go back to the previous two tests and increase the amount of material being extruded.
- You do not need to use the dovetail connection files for this, there are many tolerance test files online that will fulfill the same role.
 The printed calibration test with all the pieces able to fit together. While the object with no clearance does fit together, it required some extra force to fit together and thus in practice I print with a 0.05mm clearance.
 An example of too much clearance resulting in a poor fit.
- Finally, you will want to print a more complicated test model of your choice to make sure you don’t get surprised later on with unexpected problems when printing bigger pieces . For this step, the key is to pay attention to the print quality in particular.
Other Lightweight Materials
While a material like lightweight high temperature PLA covers most cosplay applications, manufacturers offer options such as lightweight ASA and lightweight TPU. The settings and process for calibrating these materials is similar to lightweight PLA, so this guide should also apply to those materials.
Lightweight ASA is best for when you need to print parts that won’t deform in temperatures that even high temperature lightweight PLA can’t handle. Where high temperature lightweight PLA deforms at 71°C (161F,) lightweight ASA deforms around 96°C (205°F.) For reference, many non-foaming PLA products start warping around 60°C (140°F.)
Of particular interest is lightweight TPU, also known as varioshore TPU. The amount of foaming not only impacts how heavy the final print turns out, but also how flexible and soft it is. This means that you can 3D print lightweight cosplay parts that behave similarly to EVA foam.
Visual Troubleshooting Guide
There are a few unique issues that can pop up when printing with lightweight filaments. This section is a visual troubleshooting guide for several of these errors, and outlines ways to resolve them. If you think your issue isn’t unique to lightweight filaments, Simplify3D has an excellent visual troubleshooting guide.
Problem: Under Extrusion
 An example of under extrusion. Notice the gaps on the top layer, you can also see in the holes that the print layers aren’t as neatly stacked on top of each other.
- Description: Areas of the walls in the 3D printed part have voids and/or the top layers have gaps between the printed lines.
- Solution - One of the following is usually the culprit of under extrusion when printing with lightweight filament:
- Retraction is accidentally turned on.
- Flow isn’t high enough.
- Printing Temperature is too high or too low.
First double check that Retraction is turned off. If it is turned off, then you will want to try increasing the Flow by doing test prints, increasing the flow rate in increments of 1% until the 3D print looks good. If this doesn’t work, you are finding that you are increasing your Flow by too much, or you suspect that your Printing Temperature is too high or too low, then you will want to redo the calibration process.
Other possible causes of under extrusion include a clogged extruder, filament grinding, etc. If you suspect this to be the case, you will want to look at Simplify3D’s visual troubleshooting guide for additional information.
Problem: Overheating

An example of overheating because of the print head spending too much time on a single section of a print.
- Description - The surface of the 3D printed object is buckling, blobby, or has a glassy appearance.
- Solution - This problem comes from two possible causes:
- The layer times are too short and thus the 3D print head is spending too much time on a single section of the part being printed. This usually happens when the tallest part of a 3D print is small, such as the point of a sword.
- The filament is spending too much time in the extruder causing it to overheat. This often occurs if the Minimum Layer Time isn’t set to 0.
First check that the Minimum Layer Time is set as close to zero as possible. Then ensure that the object with the sharp point is printed alongside another object. This way, as it’s printing the sharp point, it’s also spending time on the other object and letting the area around the point cool down while also not keeping the filament in the print head for too long. If you don’t have anything else to print, then just print a rectangle beside the point similar to a prime tower that would be printed when using multi-material printing.
The reason you want to print another object alongside the object with the sharp point is that the Minimum Layer Time setting is meant to allow 3D printed objects to cool enough when they come to sharp points to prevent overheating. Unfortunately, because lightweight filament itself is sensitive to the amount of energy it absorbs, you need to keep it moving through the extruder at a constant rate. Thus by printing in this manner you indirectly enforce a minimum layer time while keeping the lightweight filament from absorbing too much energy.
 An example of printing an object with a sharp point alongside another object in order to prevent overheating.
Problem: The Print Breaks When Removing from the Print Bed
 A print that broke because parts of it remained stuck to the build plate when removing.
- Description - Pieces of the 3D print broke off from the prop and are still stuck to the print bed after removing the printed parts.
- Solution - When attempting to solve this try the steps in the following order until the problem is resolved:
- Ensure that the bottom layer is being printed at the same Printing Temperature and Flow settings as the non-foaming version of the lightweight filament you are using. For example, if you are using LW-PLA-HT, the Printing Temperature and Flow settings of the initial layer should match that of non-foaming PLA filament.
- Take extra care when removing the print from the print bed. In many cases, a flexible build plate can really help with reducing the force required to remove a print.
- Try a different build plate adhesion method or a different build plate material. There are a wide variety of build plate adhesion methods and build plate materials with unique textures. If you are having issues with the print breaking when you remove it, you will want to try one with less adhesion power.
- Try increasing the thickness of the bottom layer via the Bottom Thickness setting in your slicer to 2mm or 3mm instead of the default, which is usually 1mm.
- If all else fails, try selecting the raft setting in the Build Plate Adhesion section of your slicer’s print settings.
Problem: The sharp corners of my object blob out and/or are too rounded.

An example of the sharp corners blobbing out too much (left) versus what the corners should look like (right.)
- Description - The corners and other sharp edges of your print blob out, causing visual and fit issues.
- Solution - Increase the speed of the Acceleration settings. Note that there will always be a little bit of blobbing at sharp corners, but it should be barely noticeable.

