![Enchufla Dancer Chakram [3D Print Files] 3D Files cosplay DangerousLadies](http://dangerousladies.ca/cdn/shop/files/enchufla-dancer-chakram-3d-print-files-cosplay-9435516.png?v=1762999645)
![Enchufla Dancer Chakram [3D Print Files] 3D Files cosplay DangerousLadies](http://dangerousladies.ca/cdn/shop/files/enchufla-dancer-chakram-3d-print-files-cosplay-3707042.png?v=1762999645)
![Enchufla Dancer Chakram [3D Print Files] 3D Files cosplay DangerousLadies](http://dangerousladies.ca/cdn/shop/files/enchufla-dancer-chakram-3d-print-files-cosplay-4063824.png?v=1762999645)
![Enchufla Dancer Chakram [3D Print Files] 3D Files cosplay DangerousLadies](http://dangerousladies.ca/cdn/shop/files/enchufla-dancer-chakram-3d-print-files-cosplay-1453173.png?v=1762999646)
![Enchufla Dancer Chakram [3D Print Files] 3D Files cosplay DangerousLadies](http://dangerousladies.ca/cdn/shop/files/enchufla-dancer-chakram-3d-print-files-cosplay-8780901.png?v=1762999644)
![Enchufla Dancer Chakram [3D Print Files] 3D Files cosplay DangerousLadies](http://dangerousladies.ca/cdn/shop/files/enchufla-dancer-chakram-3d-print-files-cosplay-3015856.png?v=1762999645)
![Enchufla Dancer Chakram [3D Print Files] 3D Files cosplay DangerousLadies](http://dangerousladies.ca/cdn/shop/files/enchufla-dancer-chakram-3d-print-files-cosplay-1707407.png?v=1762999645)
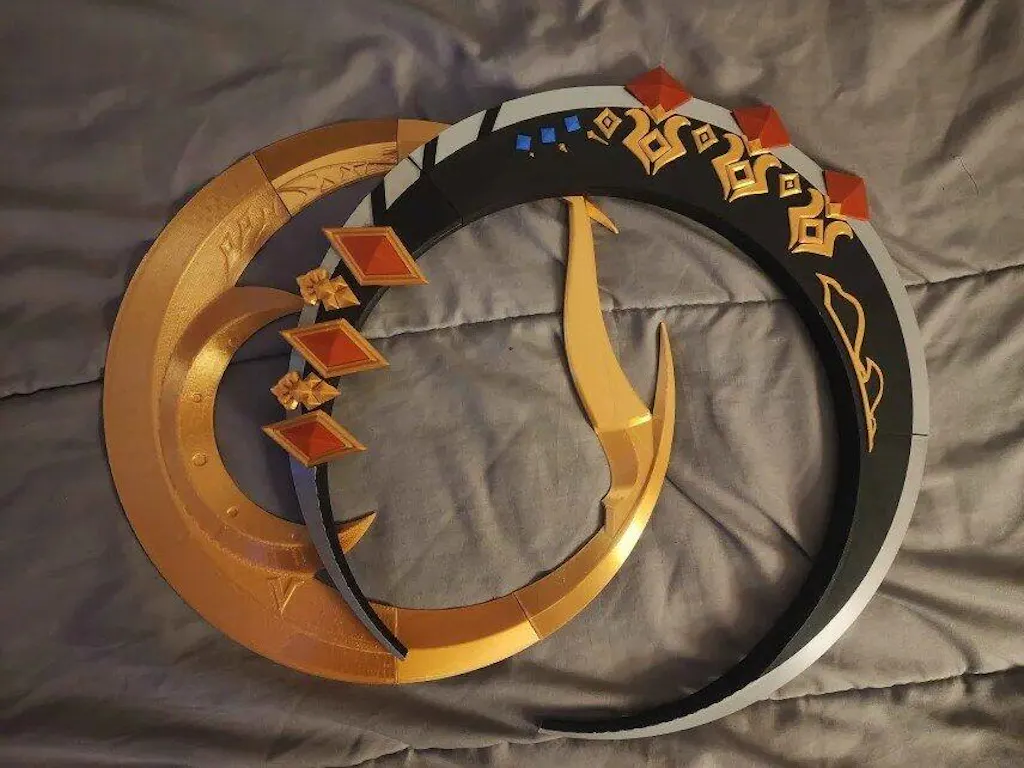
Dangerous Ladies' 3D models for Enchufla Dancer's Arm
Model by Cole Nielsen (@_craftcentric)
.stl format. Sliced for a printer 250mm x 250mm. Ring is approximately 15" across. Gems print separately for easy printing and painting.
The secondary blade pivots on a single pin that can be screwed to the main blade using an m5 screw. To screw it in, the main blade pieces must still be assembled top from bottom, so assemble the prop into a full top and bottom halves using the H shaped keys to hold your glue joints together, put the screw in, and then use the dovetail keys to secure the entire assembly together. The m5 screw self-threads into the moon blade's shaft and stays there.
You can, of course, assemble it static in one piece if you don't want it to move, or want to simplify assembly!
Files include:
- Photos
- .STL files
Please do not redistribute or resell. Intended for personal use only. Commercial use must buy a new copy for each item produced.
Feel free to tag us to show us what you print and make! We love to see finished works.
DANGEROUSLADIES.CA
https://bsky.app/profile/dangerousladies.ca
http://instagram.com/thedangerousladies

Enchufla Dancer Chakram [3D Print Files]
SKU: 50979102032189
Instant Download
Email Delivery
Modelled in Canada
Shipping calculated at checkout.
Dangerous Ladies' 3D models for Enchufla Dancer's Arm
Model by Cole Nielsen (@_craftcentric)
.stl format. Sliced for a printer 250mm x 250mm. Ring is approximately 15" across. Gems print separately for easy printing and painting.
The secondary blade pivots on a single pin that can be screwed to the main blade using an m5 screw. To screw it in, the main blade pieces must still be assembled top from bottom, so assemble the prop into a full top and bottom halves using the H shaped keys to hold your glue joints together, put the screw in, and then use the dovetail keys to secure the entire assembly together. The m5 screw self-threads into the moon blade's shaft and stays there.
You can, of course, assemble it static in one piece if you don't want it to move, or want to simplify assembly!
Files include:
- Photos
- .STL files
Please do not redistribute or resell. Intended for personal use only. Commercial use must buy a new copy for each item produced.
Feel free to tag us to show us what you print and make! We love to see finished works.
DANGEROUSLADIES.CA
https://bsky.app/profile/dangerousladies.ca
http://instagram.com/thedangerousladies
Reviews

Finishing Guides

Finishing 3D Prints 101: Basic Supplies for Bodyshopping
This guide is a great follow-along if you've purchased any Dangerous Ladies 3D printed cosplay props. This article is on the basic supplies you'll need for sanding FDM prints, with no...

Finishing 3D Prints 101: Joining Pieces Guide
This tutorial will teach you to join 3D Printed pieces together seamlessly, the easy way!