![Estinien's Gae Bolg Lance [3D Print Files] 3D Files cosplay DangerousLadies](http://dangerousladies.ca/cdn/shop/products/estiniens-gae-bolg-lance-3d-print-files-135566.jpg?v=1751895272)
![Estinien's Gae Bolg Lance [3D Print Files] 3D Files cosplay DangerousLadies](http://dangerousladies.ca/cdn/shop/products/estiniens-gae-bolg-lance-3d-print-files-910759.jpg?v=1751895272)
![Estinien's Gae Bolg Lance [3D Print Files] 3D Files cosplay DangerousLadies](http://dangerousladies.ca/cdn/shop/products/estiniens-gae-bolg-lance-3d-print-files-287742.jpg?v=1751895272)
![Estinien's Gae Bolg Lance [3D Print Files] 3D Files cosplay DangerousLadies](http://dangerousladies.ca/cdn/shop/products/estiniens-gae-bolg-lance-3d-print-files-549371.jpg?v=1751895272)
![Estinien's Gae Bolg Lance [3D Print Files] 3D Files cosplay DangerousLadies](http://dangerousladies.ca/cdn/shop/products/estiniens-gae-bolg-lance-3d-print-files-165031.jpg?v=1751895272)
![Estinien's Gae Bolg Lance [3D Print Files] 3D Files cosplay DangerousLadies](http://dangerousladies.ca/cdn/shop/products/estiniens-gae-bolg-lance-3d-print-files-730314.jpg?v=1751895272)
![Estinien's Gae Bolg Lance [3D Print Files] 3D Files cosplay DangerousLadies](http://dangerousladies.ca/cdn/shop/products/estiniens-gae-bolg-lance-3d-print-files-937261.jpg?v=1751895272)
![Estinien's Gae Bolg Lance [3D Print Files] 3D Files cosplay DangerousLadies](http://dangerousladies.ca/cdn/shop/products/estiniens-gae-bolg-lance-3d-print-files-413416.jpg?v=1751895272)
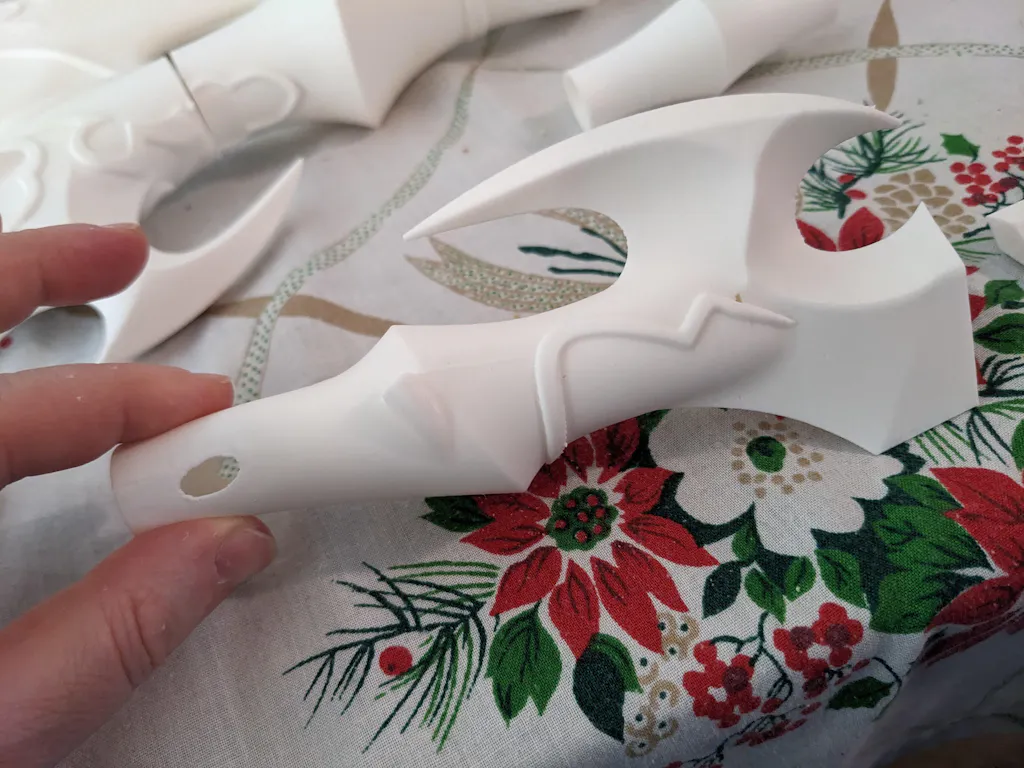
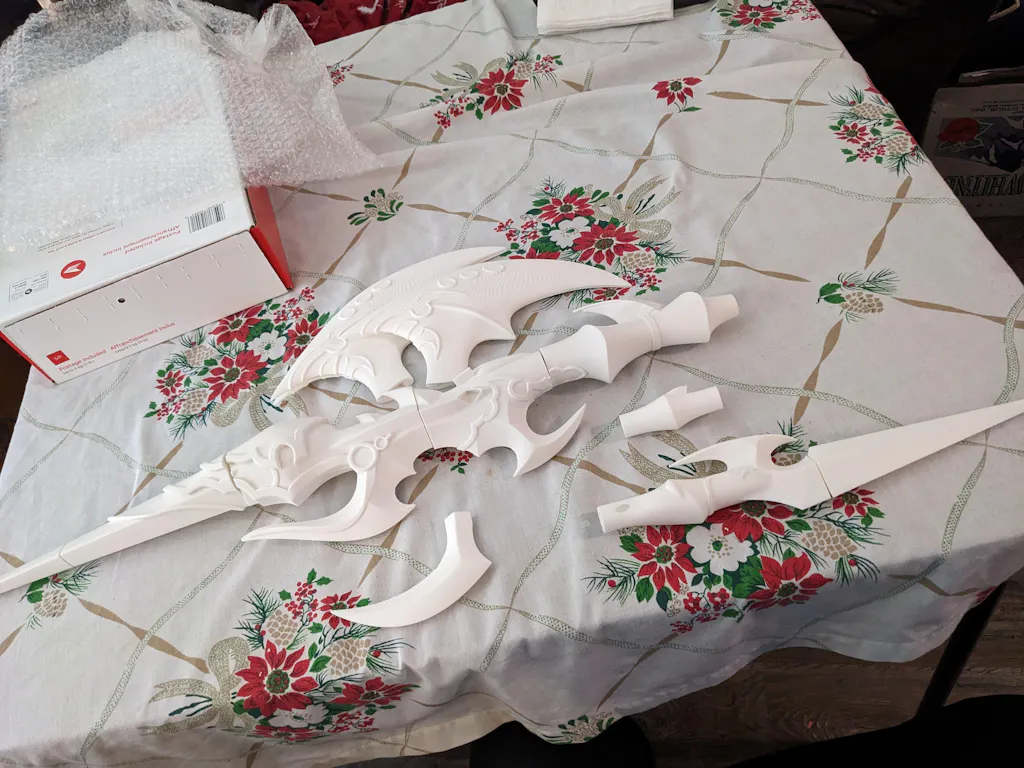
Dangerous Ladies' 3D models for Estinien Wyrmblood's Gae Bolg lance.
Model by Jennifer Rezny (@quicksparrows)
.stl format. Finishes at 92" or 72". The 92" version is pre-sliced for printing on a 200mm, 300mm or 400mm tall bed, with internal dowel slots for strength and keys for alignment. The 72" version is also sliced with keys and internal dowels, but is only for a 250mm bed.
-----------
92" VERSION:
Tail Blade:
Assembles with a 6.75” long piece of 1/4” dowel. You may want to use aluminum or steel instead of dowel to add a bit of extra weight to counter-balance the head and give it strength. Consider printing the tail blade with really dense infill and triple-thick walls as well; you’ll want to rest the lance on its end while standing/posing, and making it extra durable will make it safer to lean. It will also counter-balance the weight of the head nicely.
Head:
Assembles with a 9” long SQUARE dowel, 1/2”; this is square so it can help align the blade and add more strength. As with the tail, I suggest printing the tip with really thick walls anyway to protect it from being poked into things and snapping.
Handle:
62” of 1” dowel. If you want to put a break in it where the middle part of the handle is, where the wire starts, then you can do 22” (bottom half) and 30” (top half.)
Wire:
The red wire can be made with 1/4" aquarium tubing, or similar.
If you want to use a 3/4” PVC pipe instead, print everything at 103% scale. I suggest printing ONE piece first and taking it with you to the hardware store to test the fit; different PVC is made with different wall sizes and is measured by its inner diameter. (Hence a Schedule 40 3/4” PVC pipe having an outer diameter of just a hair over an inch.) Schedule 40, Schedule 80 and Class 200 PVC pipes should all have an outer diameter of 26.67mm but if your printer is not super fine tuned you may want to print at 104% or higher to give yourself a tiny bit of wiggle room.
-------
72" VERSION
This slimmer, longer (but still smaller) version assembles on a 3/4" rod. I suggest aluminum for strength, as a wooden dowel of this diameter may bend. It is cut 49.5" long.
It uses a 5mm OD aquarium tubing for the cord. You may want to run wire inside it to give it more strength.
It otherwise uses only printable keys so there's nothing else complicated about it.
Files include:
- Photos
- .STL files
We printed ours at 0.1 and 0.15mm layers. We suggest keeping a moderate infill (no lower than 15%) and walls of about 1-1.2mm.
Please do not redistribute or resell. Intended for personal use only. Commercial use must buy a new copy for each item produced.
Feel free to tag us to show us what you print and make! We love to see finished works.

Estinien's Gae Bolg Lance [3D Print Files]
Dangerous Ladies' 3D models for Estinien Wyrmblood's Gae Bolg lance.
Model by Jennifer Rezny (@quicksparrows)
.stl format. Finishes at 92" or 72". The 92" version is pre-sliced for printing on a 200mm, 300mm or 400mm tall bed, with internal dowel slots for strength and keys for alignment. The 72" version is also sliced with keys and internal dowels, but is only for a 250mm bed.
-----------
92" VERSION:
Tail Blade:
Assembles with a 6.75” long piece of 1/4” dowel. You may want to use aluminum or steel instead of dowel to add a bit of extra weight to counter-balance the head and give it strength. Consider printing the tail blade with really dense infill and triple-thick walls as well; you’ll want to rest the lance on its end while standing/posing, and making it extra durable will make it safer to lean. It will also counter-balance the weight of the head nicely.
Head:
Assembles with a 9” long SQUARE dowel, 1/2”; this is square so it can help align the blade and add more strength. As with the tail, I suggest printing the tip with really thick walls anyway to protect it from being poked into things and snapping.
Handle:
62” of 1” dowel. If you want to put a break in it where the middle part of the handle is, where the wire starts, then you can do 22” (bottom half) and 30” (top half.)
Wire:
The red wire can be made with 1/4" aquarium tubing, or similar.
If you want to use a 3/4” PVC pipe instead, print everything at 103% scale. I suggest printing ONE piece first and taking it with you to the hardware store to test the fit; different PVC is made with different wall sizes and is measured by its inner diameter. (Hence a Schedule 40 3/4” PVC pipe having an outer diameter of just a hair over an inch.) Schedule 40, Schedule 80 and Class 200 PVC pipes should all have an outer diameter of 26.67mm but if your printer is not super fine tuned you may want to print at 104% or higher to give yourself a tiny bit of wiggle room.
-------
72" VERSION
This slimmer, longer (but still smaller) version assembles on a 3/4" rod. I suggest aluminum for strength, as a wooden dowel of this diameter may bend. It is cut 49.5" long.
It uses a 5mm OD aquarium tubing for the cord. You may want to run wire inside it to give it more strength.
It otherwise uses only printable keys so there's nothing else complicated about it.
Files include:
- Photos
- .STL files
We printed ours at 0.1 and 0.15mm layers. We suggest keeping a moderate infill (no lower than 15%) and walls of about 1-1.2mm.
Please do not redistribute or resell. Intended for personal use only. Commercial use must buy a new copy for each item produced.
Feel free to tag us to show us what you print and make! We love to see finished works.
Reviews
Finishing Guides

Finishing 3D Prints 101: Basic Supplies for Bodyshopping
This guide is a great follow-along if you've purchased any Dangerous Ladies 3D printed cosplay props. This article is on the basic supplies you'll need for sanding FDM prints, with no...

Finishing 3D Prints 101: Joining Pieces Guide
This tutorial will teach you to join 3D Printed pieces together seamlessly, the easy way!