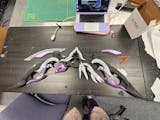
Dangerous Ladies' 3D models for the Whisper of the Past bow.
Models by Jennifer Rezny (@quicksparrows)
.stl format. Should fit on any printer at least 200mm tall at full scale. Finishes at 56" at full scale; if you print it at 85%, it drops to 46". This is a pretty ambitious project, but if you don't have a lot of printing experience, then you can easily close the gap with tenacity. I've included some whole parts for those who want to cut their own, but generally speaking this print is 60+ pieces.
The print is composed of three types of parts:
- MAIN BODY pieces that make the internal under structure (black). These have hollow channels inside connecting a pocket in the center front to all the clear parts; the pocket is enough space for a battery pack and small electronics, and has a door that can be attached overtop. The gem is also removable to access from the other side. You'll want to print these with pretty durable walls. All keys are included; you'll want to print those flat/low on the bed so that the print lines the long ways. It'll be stronger that way!
- WHITE PARTS are the pale pink/white parts on the bow. These all attach on pegs to the main body. Many of them have slots for magnets so you can make these parts pop on and off as desired for storage/travel/replacements/etc. These are not structural and can be printed pretty light to save on weight.
- TRANSPARENT PARTS are designed hollow so lights can run into them. I suggest printing these with at least 2mm walls so that the walls of the hollow parts are solid and you do not get infill showing through. If you don't want them to light up, you can print with whatever settings you prefer.
Files include:
- Photos
- .STL files
Please do not redistribute or resell. Intended for personal use only. Commercial use must buy a new copy for each item produced.
Feel free to tag us to show us what you print and make! We love to see finished works.
Reviews
Finishing Guides

Quick Finishing Guide - 3D Printed and Resin Kits
Just purchased a kit? Thanks for supporting us! Don't know where to start in assembling your 3D Print or Resin kit? We've got you covered.

Finishing 3D Prints 101: Basic Supplies for Bodyshopping
This guide is a great follow-along if you've purchased any Dangerous Ladies 3D printed cosplay props. This article is on the basic supplies you'll need for sanding FDM prints, with no...

![White Mage's Bunny's Crescent Staff [3D Printed Kit] 3D Printed Kit cosplay DangerousLadies](http://dangerousladies.ca/cdn/shop/products/white-mages-bunnys-crescent-staff-3d-printed-kit-246548.jpg?v=1751892890&width=320)
![Elysia's Whisper of the Past Bow [3D Print Files] 3D Files cosplay DangerousLadies](http://dangerousladies.ca/cdn/shop/products/elysias-whisper-of-the-past-bow-3d-print-files-781636.jpg?v=1751894800&width=320)
![Elysia's Whisper of the Past Bow [3D Print Files] 3D Files cosplay DangerousLadies](http://dangerousladies.ca/cdn/shop/products/elysias-whisper-of-the-past-bow-3d-print-files-443776.jpg?v=1751894800&width=320)
![Elysia's Whisper of the Past Bow [3D Print Files] 3D Files cosplay DangerousLadies](http://dangerousladies.ca/cdn/shop/products/elysias-whisper-of-the-past-bow-3d-print-files-498314.jpg?v=1751894801&width=320)
![Elysia's Whisper of the Past Bow [3D Print Files] 3D Files cosplay DangerousLadies](http://dangerousladies.ca/cdn/shop/products/elysias-whisper-of-the-past-bow-3d-print-files-506581.jpg?v=1751894801&width=320)
![Elysia's Whisper of the Past Bow [3D Print Files] 3D Files cosplay DangerousLadies](http://dangerousladies.ca/cdn/shop/products/elysias-whisper-of-the-past-bow-3d-print-files-496731.jpg?v=1751894801&width=320)

